Transporting koi may seem simple—just scoop them up, bag them, and go—but for these sensitive fish, even a short trip can be stressful or fatal if done wrong. Whether you’re moving koi from a breeder to your home, transferring them to a new pond, or sending them across cities (or even states), knowing how to handle transportation safely is essential.
In this comprehensive guide, we’ll explore how to prepare your koi for transport, the right tools and methods, and the mistakes to avoid to ensure your fish arrive calm, healthy, and vibrant.
Let’s dive in.
🎯 1. Why Proper Koi Transportation Matters
Koi are hardy, but they’re also extremely sensitive to changes in water temperature, oxygen levels, and water chemistry. When moved, they face multiple stress factors at once:
-
Fluctuations in temperature
-
Lack of oxygen during transit
-
Ammonia buildup in confined bags
-
Physical injury from handling or collisions
-
Psychological stress from confinement and motion
Without proper precautions, koi may develop shock, infections, or even die within hours after transport.
That’s why preparation and the right handling techniques make all the difference between a smooth relocation and a disaster.
🧰 2. Preparation Before the Move
🕐 1–2 Days Before Transport: Stop Feeding
One of the most important rules is: Don’t feed your koi for at least 24–48 hours before moving them.
Why? Because koi digest slowly, and uneaten food or waste can pollute the transport water quickly, increasing ammonia and lowering oxygen levels.
🟢 Pro Tip: If your koi are large or you’re planning a long journey (over 5 hours), extend fasting to 48 hours for cleaner water and lower stress.
🧴 Check Water Quality Before Transport
The pond water you use for packing should be clean, well-oxygenated, and free from high ammonia or nitrate levels. If you’re buying koi from a breeder, they’ll usually prepare ideal water for bagging. But if you’re moving your own fish:
-
Test pH (aim for 7.0–8.0)
-
Check ammonia (should be near 0 ppm)
-
Make sure temperature is stable
If your pond has algae blooms or debris, replace some of the water a day before to improve conditions.
🧊 Prepare the Right Equipment
You’ll need:
-
Koi net (fine mesh and soft material)
-
Koi sock net or fish transport bag
-
Plastic bags with double lining
-
Rubber bands or sealing clips
-
Pure oxygen tank or air pump
-
Insulated transport box or cooler
-
Dechlorinated pond water
🟢 Pro Tip: Never use household containers or buckets that once held soap, chemicals, or detergents—traces can kill koi instantly.
🚚 3. The Right Way to Catch and Handle Koi
🎣 Use the Right Net
Use a soft, wide koi net to guide (not chase) your koi into a smaller area. Koi are fast and easily stressed if chased around the pond.
Once near the edge, gently guide them into a koi sock net—this is a long, fabric tube that supports the koi’s entire body while lifting it out of the water.
🚫 Don’t Lift by the Tail or Hands
Never grab a koi with your bare hands or by its tail. Their scales and slime coat are delicate, and rough handling can cause wounds or infection.
🪣 Transfer Gently
If possible, submerge the transport bag or sock partially into the pond before moving, so the koi swims in voluntarily. Keep them calm and minimize splashing.
🟢 Pro Tip: Koi can jump during handling, so always keep a secure lid or cover over the transport container.
💧 4. How to Bag Koi Properly for Transport
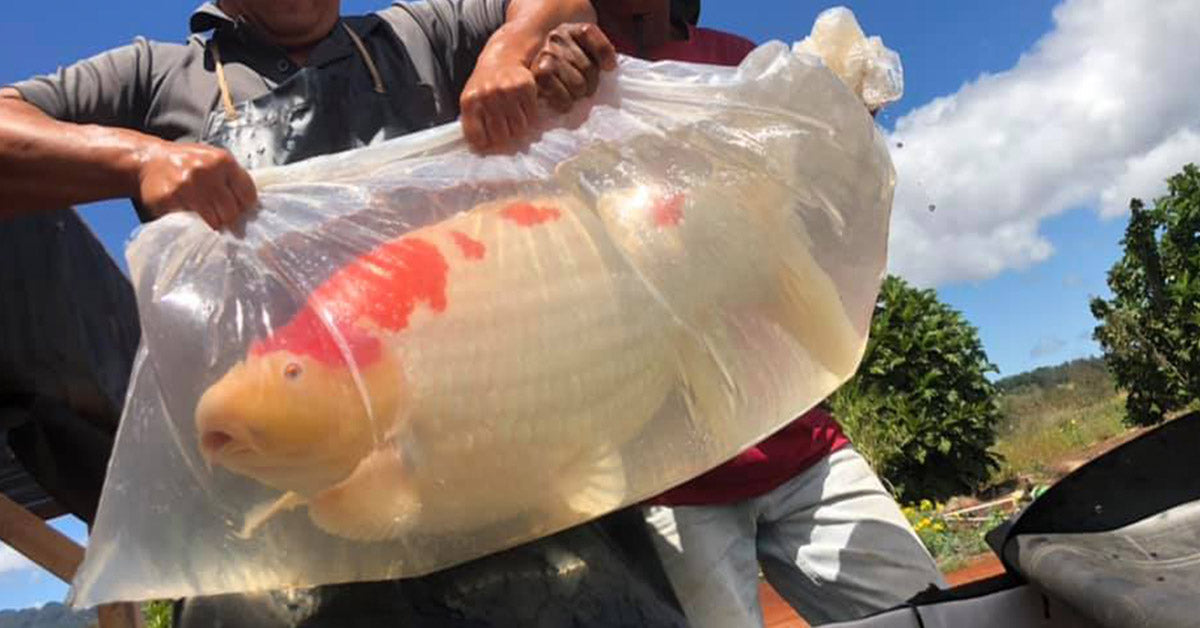
Professional breeders and hobbyists usually use plastic fish bags for koi transport. The process involves balancing water, oxygen, and temperature carefully.
⚖️ Water-to-Air Ratio
Use a 1:2 ratio of water to oxygen:
-
One-third clean pond water
-
Two-thirds oxygen (from a tank, not room air)
For small koi (under 12"), a standard 18"x36" bag is sufficient. For larger koi (over 18"), use 24"x48" or larger.
If oxygen tanks aren’t available, you can temporarily use an air pump to fill the bag with air, but oxygen tanks are preferred for trips longer than 1 hour.
🔁 Double-Bag for Safety
Always double (or triple) bag your koi to prevent punctures from fins or transport movement. Seal tightly with rubber bands or heat sealer.
Then place the bag into an insulated box or cooler to maintain temperature.
🌡️ 5. Temperature Management During Transport
Koi are temperature-sensitive. Rapid changes (more than 2–3°C difference) can cause shock, immune suppression, or even death.
🧊 Keep It Cool—but Not Cold
For short trips in summer, slightly cooler water (around 68°F / 20°C) helps keep koi calm and reduces metabolism.
Avoid extreme cold—temperatures below 60°F (15°C) for long periods can stress them.
☀️ Avoid Direct Sunlight
Never leave koi bags in the sun or inside a hot car. Even a few minutes can overheat the water and suffocate your koi.
🟢 Pro Tip: In winter, use insulated boxes and heat packs (wrapped in cloth, never touching the bag directly) to prevent freezing.
✈️ 6. Transporting Koi Over Long Distances
For journeys longer than a few hours—or if you’re shipping koi—extra precautions are necessary.
🚛 Ground Transport
-
Use insulated fish boxes or coolers.
-
Add a small battery-powered air pump if oxygen isn’t sealed in bags.
-
Stop every few hours to check water temperature and oxygen if possible.
🛫 Air Transport (for Imported Koi)
Most koi shipped internationally are packed by professional breeders:
-
Bags are filled with pure oxygen and sealed.
-
Each box typically holds 2–5 koi depending on size.
-
They can survive up to 24–36 hours this way if temperatures are stable.
Upon arrival, koi must be acclimated slowly before release (see below).
🏠 7. Acclimating Koi After Transport
The most critical phase happens after transport—when koi are introduced to their new pond or quarantine tank.
🪣 Step 1: Float the Bag
Float the unopened transport bag in the new pond or quarantine tank for 20–30 minutes. This allows temperatures to equalize gradually.
💧 Step 2: Mix Water Slowly
Open the bag and slowly add small amounts of pond water every 5–10 minutes for about 30 minutes.
This lets koi adjust to new pH, hardness, and mineral levels.
🐟 Step 3: Gently Release the Koi
Use a koi sock or pour gently—avoid dumping the transport water into your pond (it may contain waste or ammonia buildup).
🟢 Pro Tip: Always quarantine new koi for 2–3 weeks before adding them to your main pond to prevent introducing parasites or bacteria.
⚠️ 8. Common Koi Transport Mistakes (and How to Avoid Them)
❌ 1. Feeding Before Travel
Feeding koi before transport causes waste buildup in the bag, raising ammonia and reducing oxygen.
✅ Solution: Fast koi 24–48 hours before moving.
❌ 2. Using Tap Water
Tap water contains chlorine or chloramine that can burn gills.
✅ Solution: Always use dechlorinated pond water or bottled pond-safe water.
❌ 3. Insufficient Oxygen
Sealing bags with normal air leads to oxygen depletion.
✅ Solution: Use an oxygen tank or portable air pump for long trips.
❌ 4. Temperature Shock
Introducing koi directly from transport water into a different-temperature pond causes immediate stress or death.
✅ Solution: Float and acclimate slowly over 30–60 minutes.
❌ 5. Mixing Old and New Water
Pouring transport water into your pond introduces ammonia, bacteria, and possibly parasites.
✅ Solution: Net koi out of the bag and release them without mixing waters.
❌ 6. Overcrowding in Bags
Packing too many koi together reduces oxygen and increases stress.
✅ Solution: Use separate bags or boxes for large fish or long trips.
🧠 9. Bonus Tips from Experienced Koi Keepers
-
Transport koi early morning or late evening to avoid heat.
-
Label bags clearly with fish size, count, and oxygen fill time.
-
Avoid sudden vibrations or noise—keep boxes stable during travel.
-
Always keep backup supplies: rubber bands, extra bags, and air pump.
-
Use dark bags or covers—reducing light helps keep koi calm.
-
Monitor koi post-transport for 48 hours. If they appear sluggish or gasp at the surface, test ammonia and oxygen levels immediately.
-
Use mild stress-reducing additives like “Stress Coat” or “Pond Prime” (optional) to help restore slime coat.
🧪 10. Aftercare: What to Watch After Arrival
Even with careful handling, koi can remain stressed for a few days.
Here’s how to support recovery:
🐠 Observe Behavior
Healthy koi should swim calmly and respond to food after a day or two.
If they isolate, clamp fins, or hover near the surface, test for ammonia, nitrites, and oxygen.
💧 Partial Water Change
After 24 hours, perform a 10–20% water change in the quarantine tank to remove waste and refresh oxygen levels.
🍽️ Gradual Feeding
Wait at least 24 hours before feeding. Start with light, easily digestible food like wheat germ pellets.
🌡️ Stable Temperature
Avoid sudden fluctuations—keep the tank within 1–2°C of the transport temperature for a few days.
🩺 Check for Parasites or Infection
Stress can weaken immunity, making koi vulnerable to parasites like Ich or flukes. Use a microscope check or observation period in quarantine.
🌍 11. Transporting Koi for Shows or Sales
If you’re attending koi competitions or selling koi, consistency and biosecurity are critical.
-
Use separate nets and containers for each group to prevent cross-contamination.
-
Disinfect nets and bags after each use with potassium permanganate or Virkon.
-
Keep koi shaded and aerated during waiting periods.
-
Upon returning home, quarantine show koi before reintroducing them to your main pond.
🧾 12. Quick Checklist for Koi Transport
✅ Stop feeding 24–48 hours before
✅ Prepare clean, dechlorinated pond water
✅ Use soft koi net and sock net
✅ Double-bag with oxygen
✅ Keep temperature stable
✅ Transport in insulated containers
✅ Float and acclimate before release
✅ Quarantine new koi for 2–3 weeks
💬 Conclusion: Safe Koi Transport Is All About Preparation
Moving koi isn’t just about getting them from point A to B—it’s about keeping them calm, comfortable, and healthy throughout the journey.
A well-prepared koi owner minimizes stress, protects water quality, and ensures smooth acclimation to the new home.
Remember: koi can live for decades, so investing time and care in proper handling pays off in long-term health, brilliant colors, and graceful swimming for years to come.
When it comes to koi, the journey matters just as much as the destination.

