Introduction: Why Make Your Own Koi Food?
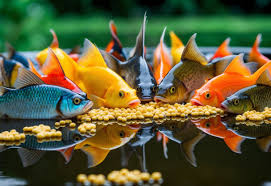
If you’re a koi enthusiast, you already know that feeding is one of the most enjoyable—and expensive—parts of the hobby. Premium koi food brands often promise faster growth, deeper colors, and better immunity, but the price tags can be intimidating. What if you could make your own koi feed that’s nutritious, natural, and affordable?
Welcome to the world of DIY koi food—a sustainable, creative, and rewarding way to care for your fish. With the right ingredients, you can customize the diet to suit your koi’s needs, improve water quality, and even enhance their colors naturally.
In this blog, we’ll walk you through everything you need to know about homemade koi food—from understanding koi nutrition to step-by-step recipes and feeding strategies. Whether you’re a pond beginner or a long-time koi keeper, this guide will help you feed smarter while saving money.
1. Understanding Koi Nutrition Basics
Before diving into recipes, it’s essential to understand what your koi actually need to stay healthy and vibrant. A good koi diet should balance protein, fat, carbohydrates, vitamins, and minerals.
🟢 Protein (30–40%)
Koi are omnivorous, but protein is their main building block for growth and muscle development.
Best protein sources: Fish meal, shrimp, silkworm pupae, bloodworms, and soybean meal.
🟡 Fat (5–10%)
Fats are koi’s energy source, helping them maintain body temperature and vitality.
Good fats: Fish oil, flaxseed oil, or spirulina oil.
🟠 Carbohydrates (25–35%)
These provide energy but should be easily digestible to prevent water pollution.
Carb sources: Wheat germ, rice bran, oats, or cornmeal.
🔵 Vitamins & Minerals
Koi need vitamins A, D, E, and C for immune health, bone strength, and color.
Natural sources: Fresh vegetables, seaweed, garlic, and spirulina powder.
2. Benefits of DIY Koi Food
Making your own koi food offers several long-term advantages:
-
💰 Cost Savings: Store-bought pellets can cost 3–5 times more than homemade feed.
-
🌿 Control Over Ingredients: You know exactly what goes into your koi’s diet—no fillers or harmful preservatives.
-
🎨 Enhanced Coloration: Natural ingredients like spirulina and shrimp shell powder can deepen reds and brighten whites.
-
🧡 Better Health: Homemade food is fresh, less processed, and often easier to digest.
-
🌍 Eco-Friendly: Reduce packaging waste and reliance on mass production.
3. Tools and Ingredients You’ll Need
Basic Tools
-
Blender or food processor
-
Large mixing bowl
-
Cooking pot or steamer
-
Ice cube trays or silicone molds
-
Dehydrator or oven
Essential Ingredients
You can mix and match depending on your koi’s needs and seasonal conditions:
-
Fish meal or shrimp meal (protein base)
-
Wheat germ or rice bran (carbohydrate source)
-
Spirulina powder (color enhancer)
-
Gelatin powder (binder)
-
Garlic powder (natural antibiotic)
-
Spinach, peas, carrots (vitamin boost)
-
Flaxseed or fish oil (fat source)
Optional: Brewer’s yeast, kelp powder, paprika, or vitamin supplements.
4. Classic DIY Koi Pellet Recipe
Here’s a simple and effective recipe suitable for year-round feeding.
Ingredients:
-
2 cups fish meal or shrimp meal
-
1 cup wheat germ
-
½ cup soy flour
-
½ cup blended spinach and carrots
-
1 tablespoon spirulina powder
-
1 tablespoon flaxseed oil
-
2 packets gelatin (for binding)
-
Water as needed
Instructions:
-
Blend Ingredients: Mix all dry ingredients first, then slowly add blended vegetables.
-
Add Water: Gradually pour warm water while stirring until a dough-like texture forms.
-
Form Pellets: Roll into small pellets or press into silicone molds.
-
Cook: Steam the mixture for about 10 minutes until firm.
-
Dry: Use a dehydrator or oven (at 120°F/50°C) for 6–8 hours until dry and hard.
-
Store: Keep in airtight containers in a cool, dark place.
Result: Floating, nutrient-rich pellets that can last up to 3 months.
5. High-Protein Growth Food Recipe
If your koi are young or in their summer growth phase, this recipe supports rapid development.
Ingredients:
-
3 cups fish meal
-
1 cup soybean meal
-
½ cup shrimp shell powder
-
2 tablespoons fish oil
-
½ cup oat flour
-
1 tablespoon garlic paste
-
1 teaspoon vitamin mix
Instructions:
-
Blend all dry materials.
-
Add fish oil and garlic paste for aroma and immune support.
-
Add just enough warm water to form a thick paste.
-
Roll into small pellets.
-
Bake or dry thoroughly until hard.
💡 Tip: Feed sparingly during high temperatures to prevent oxygen depletion.
6. Color-Enhancing Koi Food Recipe
Perfect for show koi or hobbyists who want to enhance their koi’s reds (hi) and whites (shiroji).
Ingredients:
-
2 cups shrimp meal or krill meal
-
½ cup spirulina powder
-
½ cup paprika
-
1 cup wheat germ
-
½ cup carrots (steamed and mashed)
-
1 tablespoon flaxseed oil
-
Gelatin (binder)
Directions:
-
Mix all ingredients evenly.
-
Add warm water and gelatin to create a soft paste.
-
Mold and dry as before.
-
Feed 2–3 times per week alternating with regular food.
🌈 Result: Enhanced color vibrancy and sheen within 3–4 weeks of consistent feeding.
7. Seasonal Feeding Adjustments
Spring (15–20°C / 59–68°F)
-
Koi’s metabolism starts rising.
-
Feed wheat germ-based or light protein food.
-
Avoid overfeeding; digestive systems are still slow.
Summer (Above 20°C / 68°F)
-
Growth season!
-
Feed high-protein and high-fat recipes.
-
Offer multiple small meals daily.
Autumn (15–20°C / 59–68°F)
-
Gradually reduce protein and switch to wheat germ again.
-
Add immune-boosting ingredients like garlic or vitamin C.
Winter (Below 10°C / 50°F)
-
Koi metabolism slows dramatically.
-
Feed minimal or stop feeding entirely if below 8°C.
8. Feeding Tips for Homemade Koi Food
-
🕐 Feed Small Amounts: Only feed what koi can consume in 5 minutes to prevent waste.
-
💧 Soften Before Feeding: If the food is too hard, soak it in pond water for a minute.
-
🧊 Freeze for Storage: Frozen homemade food can last 6–9 months.
-
🔄 Rotate Diets: Alternate between commercial and homemade feeds for balance.
-
🩺 Observe Behavior: If koi show sluggishness or bloating, reduce portions.
9. Troubleshooting Common Problems
❌ Pellets Sink Too Quickly
Add more wheat germ or reduce oil content for better buoyancy.
❌ Koi Refuse to Eat
They might not recognize new food—mix small amounts with their usual feed until they adapt.
❌ Cloudy Water After Feeding
Indicates excess carbs or overfeeding. Adjust recipes and feeding frequency.
❌ Mold Growth During Storage
Ensure food is completely dry before sealing, or add a desiccant pack to storage containers.
10. Final Thoughts: Balance Is Key
Homemade koi food is not just about saving money—it’s about understanding your koi’s natural needs and creating a diet that supports health, longevity, and beauty. When you make food yourself, you gain control, creativity, and confidence in your koi care routine.
Just remember: no single recipe fits all ponds. Experiment, observe your koi’s reactions, and tweak ingredients as needed. Over time, you’ll develop the perfect blend for your pond’s ecosystem and your fish’s preferences.
Conclusion: Feed with Purpose, Not Just Habit
Feeding koi should never be a mindless task—it’s an act of care, observation, and connection. By crafting your own DIY koi food, you transform feeding time into a meaningful ritual that benefits both your fish and your wallet.
Healthy koi don’t just happen—they’re nurtured through thoughtful, balanced diets and mindful care. So put on your apron, grab your blender, and start creating koi food that’s as unique and vibrant as your pond itself.
