
Mosquito nets and window screens are one of the simplest yet most effective barriers between your home and insects. Whether installed on windows, patios, doors, or outdoor sleeping areas, they quietly protect your living space from mosquitoes, flies, and other unwanted pests.
But here’s a situation many homeowners face: a small tear appears in the mesh. Maybe it was caused by a pet’s claws, strong wind, accidental impact, or simple aging. Most people assume the only solution is to replace the entire screen.
That assumption often leads to unnecessary expense and waste.
In reality, many damaged mosquito nets can be repaired quickly, affordably, and durably — sometimes becoming even stronger than before. With the right techniques and reinforcement coatings, you can extend the lifespan of your mosquito net by years.
This guide will walk you through everything you need to know, including:
-
How to evaluate screen damage correctly
-
When repair is better than replacement
-
Step-by-step repair methods for different types of tears
-
How reinforcement coatings dramatically increase durability
-
Professional maintenance habits that prevent future damage
Let’s turn a frustrating tear into an easy home improvement win.
Why Mosquito Nets Tear in the First Place
Understanding the cause of damage helps you choose the best repair method and prevent repeat problems.
1. Material Fatigue Over Time
Most mosquito screens are exposed daily to:
-
UV radiation
-
Temperature fluctuations
-
Moisture
-
Dust accumulation
Over time, fibers weaken and become brittle. Even gentle pressure can cause cracking or splitting.
2. Pet and Wildlife Damage
Cats climbing screens and dogs pushing against doors are among the most common causes of mesh failure. Outdoor wildlife, including birds and squirrels, may also scratch or bite through soft mesh materials.
3. Improper Cleaning Methods
Using hard brushes, high-pressure hoses, or harsh chemicals slowly degrades mesh coatings and fibers.
4. Frame Stress
Loose frames allow movement during wind or door use. Constant flexing creates tension points where tears begin.
5. Installation Errors
Screens installed too tightly or unevenly experience continuous strain, leading to early failure.
Knowing the root cause ensures your repair lasts instead of becoming a temporary fix.
Should You Repair or Replace the Mosquito Net?
Not every damaged screen needs replacement. Use this simple evaluation checklist.
Repair Is Ideal When:
-
The tear is smaller than 6 inches
-
Damage is localized
-
The frame remains intact
-
Mesh still feels flexible
-
Only one or two areas are affected
Replacement Is Better When:
-
Mesh is brittle across large areas
-
Multiple tears exist
-
Frame is warped or rusted
-
Screen has severe UV deterioration
In many cases, homeowners replace screens prematurely when a simple repair would work perfectly.
Tools and Materials You’ll Need
Before starting, gather basic supplies. Most repairs require inexpensive household tools.
Essential items:
-
Screen repair patches or mesh material
-
Scissors or utility knife
-
Clear waterproof adhesive
-
Needle and nylon thread (for stitching repairs)
-
Cleaning cloth
-
Rubbing alcohol or mild detergent
-
Small brush or applicator
Optional reinforcement materials:
-
Liquid screen coating
-
Protective sealant spray
-
UV-resistant mesh paint
Having the right materials ensures both strength and visual neatness.
Step 1: Clean the Damaged Area Properly
Many repair failures happen because repairs are applied to dirty surfaces.
Cleaning Process
-
Remove dust using a soft cloth.
-
Wash gently with mild soap and water.
-
Rinse thoroughly.
-
Allow the mesh to dry completely.
-
Wipe around the tear with rubbing alcohol.
Clean fibers allow adhesives and coatings to bond effectively.
Step 2: Choose the Right Repair Method
Different types of damage require different solutions.
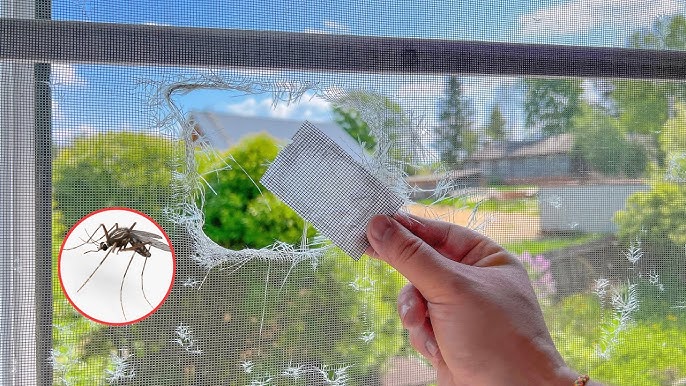
Method A: Adhesive Patch Repair (Best for Small Holes)
Ideal for punctures and small tears.
Steps:
-
Cut a patch slightly larger than the hole.
-
Apply adhesive around the damaged area.
-
Place patch over tear.
-
Press firmly from center outward.
-
Let cure according to adhesive instructions.
Pro Tip: Apply patches on both sides for stronger reinforcement.
Method B: Stitch Repair (Best for Linear Tears)
Long tears respond well to stitching.
Steps:
-
Thread needle with nylon thread.
-
Align torn edges carefully.
-
Use small looping stitches.
-
Avoid pulling too tight.
-
Seal stitches with clear adhesive.
This method preserves airflow while restoring structure.
Method C: Mesh Replacement Section (Best for Medium Damage)
If damage spans several inches, replace only the affected section.
Steps:
-
Cut a square around the damaged area.
-
Cut replacement mesh slightly larger.
-
Overlay and secure with adhesive or stitching.
-
Smooth edges carefully.
This approach restores full strength without replacing the entire screen.
Step 3: Reinforce the Repair with Protective Coating
Here’s the step most homeowners skip — and the one that makes repairs last years instead of months.
A reinforcement coating strengthens fibers and protects against future wear.
Why Coatings Matter
Modern screen coatings provide:
-
UV resistance
-
Water protection
-
Increased tensile strength
-
Reduced fraying
-
Improved durability against pets
Think of it as armor for your mesh.
Types of Reinforcement Coatings
1. Liquid Screen Sealant
Forms a flexible transparent layer over fibers.
Best for:
-
Aging screens
-
Sun-exposed windows
-
Preventive maintenance
2. Rubberized Protective Coating
Adds elasticity and tear resistance.
Best for:
-
Pet doors
-
Frequently used screens
3. UV-Blocking Spray Coating
Slows degradation caused by sunlight.
Best for:
-
South-facing windows
-
Outdoor patios
How to Apply Reinforcement Coating Correctly
-
Ensure repair is fully dry.
-
Lay screen flat or keep vertical and stable.
-
Apply thin, even coat.
-
Avoid clogging mesh holes.
-
Allow proper drying time.
-
Apply second light coat if needed.
Multiple thin layers outperform one thick application.
Step 4: Strengthen Weak Areas Before They Tear
Preventive reinforcement is often more valuable than repair itself.
Focus on:
-
Screen corners
-
Door handle height
-
Pet contact zones
-
Frame edges
Applying coating early can double screen lifespan.
Common Repair Mistakes to Avoid
Using Super Glue
Rigid adhesives crack when mesh flexes.
Skipping Cleaning
Dust prevents bonding.
Oversized Patches
Large patches reduce airflow and look obvious.
Pulling Mesh Too Tight
Creates new stress points.
Ignoring Frame Alignment
Even perfect repairs fail if the frame moves.
Repairing Different Screen Materials
Not all mosquito nets behave the same.
Fiberglass Mesh
-
Easy to repair
-
Flexible
-
Works well with adhesive patches
Aluminum Mesh
-
Requires stitching or metal-compatible adhesive
-
Avoid bending fibers
Polyester Mesh
-
Durable but benefits greatly from coatings
Stainless Steel Mesh
-
Rarely tears but needs specialized tools
Always match repair materials to mesh type.
How Long Do Repairs Last?
With proper reinforcement:
-
Basic patch repair: 6–12 months
-
Reinforced repair: 2–5 years
-
Preventively coated screens: up to double original lifespan
Environmental exposure and usage frequency influence durability.
Seasonal Maintenance Routine
Create a simple yearly habit.
Spring
-
Inspect for small tears
-
Clean screens
-
Apply UV coating
Summer
-
Check high-use areas
-
Repair early damage
Fall
-
Deep clean
-
Reinforce weak zones
Winter
-
Store removable screens indoors if possible
Consistent maintenance prevents large repairs later.
Pet-Proofing Your Mosquito Nets
If pets caused the damage, reinforce strategically.
Tips include:
-
Install pet-resistant mesh at lower sections
-
Apply rubberized coating in scratch zones
-
Add protective barriers near doors
-
Trim pet nails regularly
Combining behavior management with reinforcement works best.
Cost Comparison: Repair vs Replacement
| Option | Average Cost | Lifespan |
|---|---|---|
| Small repair | Very low | 1–3 years |
| Reinforced repair | Low | 3–5 years |
| Full replacement | High | 5–8 years |
Repairing early offers the highest value.
Eco-Friendly Benefits of Repairing Screens
Repairing instead of replacing:
-
Reduces landfill waste
-
Conserves manufacturing resources
-
Lowers household expenses
-
Extends material lifecycle
Small home repairs collectively create meaningful environmental impact.
Signs Your Screen Needs Immediate Attention
Don’t delay repairs if you notice:
-
Curling edges
-
Frayed fibers
-
Increased insects indoors
-
Loose screen tension
-
Small holes spreading quickly
Early action prevents larger failures.
Advanced Reinforcement Techniques (DIY Pro Level)
For homeowners wanting maximum durability:
Double-Layer Edge Reinforcement
Apply narrow mesh strips along frame edges before coating.
Fiber Fusion Method
Light adhesive brushed into fibers before sealant application increases bonding strength.
Hybrid Patch System
Combine stitching + adhesive + coating for heavy-use areas.
These techniques are especially useful for patio doors and outdoor enclosures.
Frequently Asked Questions
Can repaired screens still look good?
Yes. Transparent adhesives and careful trimming make repairs nearly invisible.
Will coating block airflow?
Not when applied correctly in thin layers.
Is repair safe for indoor screens?
Absolutely — once coatings fully cure.
Can old screens be restored?
Often yes, especially with reinforcement coatings that restore flexibility.
Final Thoughts: A Tear Doesn’t Mean the End
A damaged mosquito net doesn’t automatically mean replacement. With modern repair methods and reinforcement coatings, most screens can be restored quickly and strengthened beyond their original condition.
The key principles are simple:
-
Repair early
-
Reinforce strategically
-
Maintain regularly
-
Protect against future stress
By learning how to repair and fortify your mosquito nets, you save money, reduce waste, and keep your home comfortably protected from insects season after season.
Sometimes the smartest home upgrade isn’t buying something new — it’s making what you already own last longer.


