
Ultraviolet germicidal lamps have become an essential part of modern disinfection systems. They are widely used in water purification equipment, HVAC systems, air sterilizers, medical facilities, laboratories, food processing plants, and industrial production lines. However, repairing a UV lamp or replacing its ballast, driver, or internal electronic components does not automatically guarantee that the lamp has regained its original sterilization capability.
One of the biggest misconceptions in the UV maintenance industry is assuming that "if the lamp lights up, it must be working properly." In reality, a repaired UV lamp may emit visible light while producing only a fraction of the ultraviolet energy required for effective disinfection. This phenomenon, often referred to as "false sterilization," creates a dangerous illusion of safety while allowing bacteria, viruses, mold spores, and other microorganisms to survive.
To ensure that a repaired UV lamp delivers genuine germicidal performance, technicians must measure and verify its actual UV output power rather than relying on appearance alone. This guide explains why UV output testing matters, how UV lamp power is measured, what instruments are required, and how to establish a reliable verification process after repair.
Why Lighting Up Does Not Mean Sterilizing
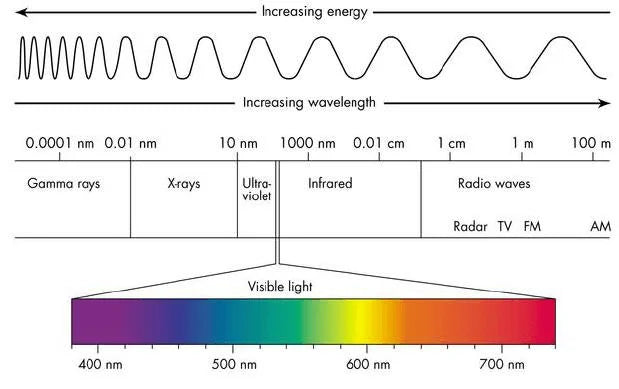
Unlike conventional lighting systems, the primary purpose of a germicidal UV lamp is not illumination but ultraviolet radiation. Most UV-C lamps operate near a wavelength of 254 nanometers, which effectively damages the DNA and RNA of microorganisms, preventing them from reproducing.
A repaired lamp may still appear operational while suffering from:
-
Reduced UV-C output.
-
Aging quartz sleeves.
-
Improper ballast operation.
-
Internal electrode degradation.
-
Low mercury vapor pressure.
-
Incorrect driving current.
Visible brightness is not a reliable indicator of germicidal effectiveness because the human eye cannot perceive UV-C radiation. In fact, a lamp can emit almost no useful UV energy while still producing a faint bluish glow.
This is why professional UV maintenance protocols require direct measurement of ultraviolet irradiance after every significant repair.
What Is UV Lamp Output Power?
Before discussing measurement methods, it is important to distinguish between electrical power and ultraviolet output power.
Electrical Input Power
This is the wattage consumed by the lamp and ballast, such as 30W, 60W, or 100W. It is measured using electrical instruments and indicates energy consumption.
UV Radiant Output
This represents the actual ultraviolet energy emitted by the lamp, typically measured in watts (W) or milliwatts (mW).
UV Irradiance
The parameter most commonly used during field testing is irradiance, measured in:
-
mW/cm² (milliwatts per square centimeter).
-
μW/cm² (microwatts per square centimeter).
Irradiance describes how much UV energy reaches a specific surface area at a given distance from the lamp and directly relates to sterilization effectiveness.
The Concept of False Sterilization
False sterilization occurs when a UV system appears functional but fails to deliver the required germicidal dose.
Several factors contribute to this condition:
Aging Lamps
Over time, the mercury inside the lamp degrades, and the quartz envelope accumulates contamination. UV output gradually declines even though the lamp still ignites normally.
Improper Repairs
Replacing a ballast with a non-compatible model may alter lamp current and reduce UV emission.
Poor Quality Replacement Components
Low-quality capacitors or switching transistors in repaired electronic ballasts can create unstable operating conditions.
Dirty Quartz Sleeves
Dust, mineral deposits, and fingerprints absorb UV-C radiation, reducing transmitted energy.
Electrical Instability
Improper soldering or degraded electrical contacts can cause fluctuating lamp output.
Without proper measurement, these issues may remain undetected.
Why Measuring UV Output After Repair Is Essential
A repaired UV lamp should never be returned to service without performance verification.
Safety Assurance
Hospitals, laboratories, and water treatment systems rely on accurate sterilization performance. Underpowered UV lamps can create serious public health risks.
Quality Control
Repair shops that provide output verification reports demonstrate higher technical standards and build greater customer confidence.
Regulatory Compliance
Many industries require documented proof that disinfection equipment meets specified performance levels.
Preventing Repeat Failures
Output testing often reveals hidden ballast or electronic problems before the equipment is placed back into operation.
Understanding UV Dose Versus UV Intensity
Many people confuse UV intensity with UV dose, but they are not the same.
UV Intensity
The amount of UV energy reaching a surface at a specific moment.
UV Dose
The total accumulated energy delivered over time.
The relationship can be expressed as:
UV Dose = UV Intensity × Exposure Time
A lamp with lower intensity may still achieve sterilization if exposure time is increased, but many real-world systems are designed around specific flow rates or air exchange cycles. Reduced intensity may therefore lead to insufficient microbial inactivation.
Consequently, measuring intensity is one of the most practical ways to verify post-repair performance.
Instruments Used to Measure UV Lamp Output
UV Irradiance Meter
A UV irradiance meter is the primary tool for measuring UV-C output. It uses a calibrated sensor designed specifically for the 254 nm wavelength emitted by low-pressure mercury lamps.
Key features include:
-
High sensitivity.
-
Digital display.
-
Calibration traceability.
-
Wavelength-specific filtering.
UV Radiometer
Professional radiometers offer enhanced accuracy and can measure total UV energy across multiple wavelengths.
Spectroradiometer
For advanced laboratory applications, spectroradiometers provide complete spectral analysis, confirming not only intensity but also wavelength distribution.
Optical Power Meter
Some industrial maintenance teams use optical power meters with UV-compatible detectors for specialized testing.
Although more expensive, these instruments provide highly repeatable measurements for quality assurance programs.
How to Properly Measure UV Lamp Output
Accurate measurement requires standardized procedures.
Step 1: Warm Up the Lamp
UV lamps do not immediately reach full output after ignition. Most low-pressure mercury lamps require approximately 5 to 15 minutes to stabilize.
Testing too early may produce inaccurate results.
Step 2: Control Ambient Conditions
Temperature significantly affects mercury vapor pressure and UV production. Perform testing within the manufacturer's recommended operating range.
Avoid direct sunlight or external UV sources that could interfere with readings.
Step 3: Position the Sensor Correctly
Place the irradiance meter sensor perpendicular to the lamp surface at a fixed distance.
Common testing distances include:
-
1 inch (25 mm).
-
10 cm.
-
30 cm.
Consistency is critical when comparing measurements over time.
Step 4: Record Multiple Measurements
Take readings at several points along the lamp length because output may vary due to electrode wear or uneven aging.
Average the results to obtain a representative value.
Step 5: Compare Against Reference Standards
Compare measured values with:
-
Manufacturer specifications.
-
Historical maintenance records.
-
Baseline measurements from new lamps.
Significant deviations indicate remaining problems requiring further investigation.
Measuring UV Output After Electronic Ballast Repair
The ballast directly influences UV lamp performance because it regulates operating current and frequency.
After replacing or repairing an electronic ballast:
Verify Operating Current
Measure lamp current and compare it with design specifications.
Monitor Voltage Stability
Fluctuating voltage may indicate poor solder joints or unstable switching components.
Observe Startup Characteristics
Delayed ignition or repeated restarting can signal hidden ballast faults.
Measure UV Output Under Load
The most important step is confirming that the repaired ballast allows the lamp to achieve its intended ultraviolet irradiance.
A ballast may appear electrically functional while still reducing UV output by 20% or more.
Common Reasons a Repaired UV Lamp Fails Output Testing
Incorrect Ballast Matching
Using a ballast with incompatible electrical characteristics may underdrive the lamp.
Aging Quartz Sleeve
Even after electronic repairs, an old or contaminated quartz sleeve can significantly reduce transmitted UV energy.
Degraded Electrodes
Internal electrode wear changes mercury vapor conditions and reduces radiation efficiency.
Poor Solder Repairs
High-resistance solder joints create voltage drops that affect ballast operation.
Counterfeit Replacement Components
Substandard capacitors or MOSFETs may fail to maintain stable switching frequencies.
How to Interpret UV Measurement Results
Technicians should establish acceptance criteria based on the application.
Excellent Performance
Measured UV output is within 95–100% of baseline specifications.
Acceptable Performance
Output remains above 80–90% of the original reference value.
Marginal Performance
Output falls between 70–80%. The system may still function but should be monitored closely.
Unacceptable Performance
Output below 70% generally indicates that further repair or lamp replacement is necessary.
Actual thresholds vary by industry and equipment manufacturer, but trend monitoring is often more valuable than relying on a single measurement.
Building a UV Lamp Verification Procedure
Professional repair facilities benefit from standardized testing protocols.
A typical verification checklist includes:
Visual Inspection
-
Check quartz sleeve cleanliness.
-
Inspect lamp housing.
-
Verify electrical connections.
Electrical Testing
-
Input voltage.
-
Ballast output voltage.
-
Operating current.
-
Power consumption.
UV Performance Testing
-
Warm-up period completed.
-
Irradiance measured at standard distance.
-
Multiple readings recorded.
-
Average value calculated.
Documentation
Record:
-
Lamp serial number.
-
Repair date.
-
Replacement components.
-
UV output measurement.
-
Technician identification.
Maintaining these records helps establish long-term reliability trends and supports quality assurance efforts.
Best Practices for Maintaining Accurate UV Output
Measurement alone is not enough; maintaining output over time requires preventive maintenance.
Clean Quartz Sleeves Regularly
Even a thin layer of contamination can block a significant portion of UV radiation.
Replace Lamps Before End of Life
Many UV-C lamps continue operating electrically long after their germicidal output has declined.
Inspect Electronic Ballasts Periodically
Aging capacitors and thermal stress gradually affect output stability.
Calibrate UV Meters
Measurement instruments themselves require periodic calibration to maintain accuracy.
Monitor Environmental Conditions
Excessive humidity, dust, or heat can shorten lamp life and alter performance.
Avoiding Common Testing Mistakes
Many inaccurate UV measurements result from procedural errors rather than equipment problems.
Measuring Immediately After Startup
The lamp may not have reached thermal equilibrium.
Using the Wrong Sensor
A UV-A or UV-B meter cannot accurately measure UV-C output.
Ignoring Distance
UV intensity decreases rapidly as distance increases. Even small positioning errors affect results.
Failing to Clean the Sensor Window
Dust or fingerprints on the detector reduce measurement accuracy.
Comparing Different Test Conditions
Measurements should always be taken under consistent environmental and geometric conditions.
The Business Value of UV Output Verification
For repair companies and maintenance providers, offering certified UV output testing creates significant advantages.
Customers increasingly understand that a glowing lamp does not guarantee effective sterilization. Providing documented irradiance measurements demonstrates technical competence and differentiates professional repair services from basic component replacement shops.
Industries such as healthcare, water treatment, pharmaceuticals, and food manufacturing often require objective proof that repaired equipment performs as intended. Verification reports help build trust while reducing disputes over repair quality.
Conclusion: Real Sterilization Requires Real Measurement
The era of simply replacing a ballast or repairing a circuit board and assuming everything is working properly is over. In critical disinfection applications, appearance alone is meaningless. A UV lamp that illuminates but fails to produce adequate ultraviolet output offers only the illusion of protection.
Rejecting false sterilization begins with understanding that UV performance must be measured, not guessed. By using calibrated UV irradiance meters, following standardized testing procedures, verifying ballast operation, and documenting output after every repair, technicians can ensure that restored UV systems deliver the germicidal energy they were designed to provide.
Ultimately, the most important question after repairing any UV lamp is not, "Does it turn on?" but rather, "Does it still produce enough UV-C power to protect the people and systems that depend on it?" Only accurate measurement can provide that answer.


