
Solar outdoor mosquito killer lamps are designed to be convenient, energy-efficient, and low-maintenance. In theory, they should work automatically: charge during the day, turn on at night, and help reduce mosquito populations without wiring or electricity costs.
Yet one of the most common frustrations homeowners face is simple but annoying — the solar mosquito lamp suddenly stops charging.
You place it under sunlight all day, but at night the light barely turns on, flickers briefly, or doesn’t work at all. Many people assume the product is defective and replace it prematurely. In reality, most charging problems come from a few predictable causes that are easy to diagnose and fix.
This guide explains the three primary reasons solar mosquito killer lamps fail to charge, how solar charging systems actually work, and practical DIY solutions that can restore performance without replacing the entire unit.
How Solar Mosquito Lamps Charge: A Simple Explanation
Before troubleshooting, it helps to understand the charging process.
A typical solar mosquito killer lamp contains four main components:
- Solar panel – converts sunlight into electricity
- Rechargeable battery – stores energy collected during the day
- Charge controller circuit – regulates voltage and protects the battery
- Light sensor – activates the lamp automatically at night
During daylight hours, sunlight hits the solar panel and generates electrical current. That current passes through a small control board and charges an internal battery. When ambient light drops in the evening, the sensor switches the lamp on using stored energy.
If any part of this chain fails, charging stops.
Most issues fall into three categories:
- Insufficient energy generation
- Battery storage failure
- Electrical pathway interruption
Let’s examine each one in detail.
Reason #1: The Solar Panel Isn’t Receiving Enough Usable Sunlight
The most common reason a solar mosquito lamp won’t charge is surprisingly simple: the panel is not actually getting effective sunlight.
Many users underestimate how sensitive solar charging is to environmental conditions.
Direct Sunlight vs. Bright Outdoor Light
Solar panels require direct sunlight, not just daylight brightness.
Common misconceptions include:
- Placing lamps under patios
- Installing near walls that block afternoon sun
- Positioning under trees
- Assuming cloudy brightness equals charging
Even partial shade can reduce charging efficiency by 50–90%.
Unlike large rooftop panels, small garden devices have limited surface area and depend heavily on optimal positioning.
Seasonal Sun Angle Problems
Solar charging performance changes throughout the year.
During winter or early spring:
- Sunlight arrives at a lower angle
- Daylight duration shortens
- Shadows lengthen
A lamp that worked perfectly in summer may stop charging months later without being moved.
Dirt and Surface Contamination
Outdoor devices accumulate debris quickly.
Common panel blockers include:
- Dust
- Pollen
- Bird droppings
- Water stains
- Oxidation film
A thin layer of dirt can reduce solar efficiency dramatically because light must penetrate the panel surface evenly.
How to Fix Sunlight Issues
Step 1: Relocate Strategically
Place the lamp where it receives:
- At least 6–8 hours of direct sunlight
- South-facing exposure (Northern Hemisphere)
- Minimal shadow between 10 AM and 4 PM
Avoid locations close to fences or dense plants.
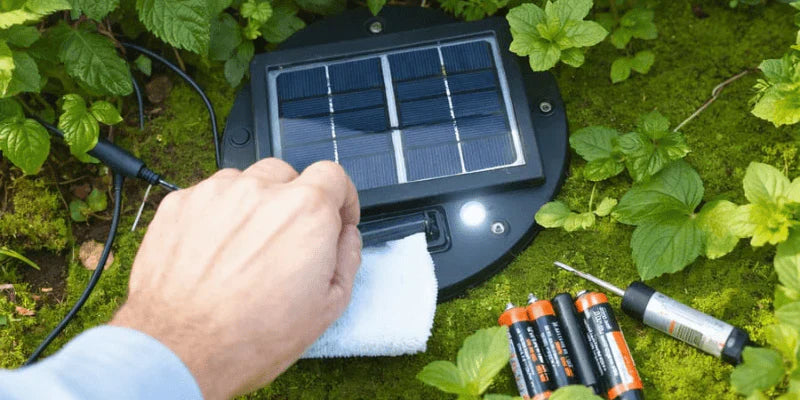
Step 2: Clean the Solar Panel Properly
Use:
- Soft microfiber cloth
- Mild soap solution
- Clean water rinse
Avoid abrasive cleaners or rough brushes that scratch the protective coating.
Cleaning once every two weeks can significantly improve charging performance.
Step 3: Adjust Panel Angle
If adjustable:
- Tilt panel toward midday sun
- Aim roughly perpendicular to sunlight
Even small angle corrections can increase energy intake.
Hidden Sunlight Blockers Many People Miss
Some unexpected charging obstacles include:
- Window glass filtering UV and infrared light
- Decorative covers partially shading panels
- Nearby reflective surfaces causing overheating
- Dust buildup inside protective plastic covers
Always inspect both outside and inside surfaces.
Reason #2: Battery Degradation or Failure
If sunlight exposure is adequate but charging still fails, the battery is usually the culprit.
Rechargeable batteries are consumable components — they wear out over time.
Why Solar Lamp Batteries Wear Out
Solar mosquito lamps typically use:
- NiMH batteries
- Lithium-ion batteries
- Lithium iron phosphate cells (newer models)
Each type has a limited number of charge cycles.
After repeated daily charging and discharging, batteries gradually lose capacity.
Signs of aging include:
- Lamp turns on briefly then shuts off
- Dim light output
- Charging indicator behaves normally but runtime is short
- Complete failure after winter storage
Heat Damage: The Silent Battery Killer
Outdoor devices experience extreme temperatures.
High heat accelerates battery aging by:
- Breaking down internal chemistry
- Increasing internal resistance
- Reducing charge retention
Direct summer sun combined with sealed housings creates thermal stress.
Deep Discharge Damage
Leaving the lamp unused for months can permanently damage batteries.
When voltage drops too low:
- Chemical reactions become irreversible
- Battery cannot accept new charge
This often happens during long rainy seasons or storage periods.
How to Test the Battery
Simple diagnostic method:
- Charge lamp under strong sunlight for a full day.
- Cover solar panel completely.
- Turn lamp on manually (if possible).
- Measure runtime.
If the light lasts only minutes, battery replacement is needed.
Replacing the Battery Safely
Most solar mosquito lamps allow battery replacement.
Steps:
- Open battery compartment.
- Note battery type and voltage.
- Replace with identical specifications.
- Observe polarity carefully.
Avoid mixing battery types or capacities.
Battery Upgrade Tip
Higher-quality rechargeable batteries often improve performance dramatically.
Choose batteries designed for:
- Solar applications
- High temperature resistance
- Low self-discharge
This single upgrade can extend operation time significantly.
Reason #3: Internal Charging Circuit or Sensor Malfunction
If sunlight and battery are both fine, the issue may lie in the electronics.
Solar lamps rely on small circuit boards that manage charging and switching.
These components are sensitive to outdoor conditions.
Water Intrusion and Moisture Damage
Even “waterproof” devices can develop leaks.
Moisture causes:
- Corrosion
- Short circuits
- Sensor malfunction
- Charging interruption
Common entry points include:
- Rubber seals aging
- Screw holes
- Cracked plastic housing
Faulty Light Sensors
Solar lamps contain light sensors that detect darkness.
If the sensor falsely detects daylight, the lamp may:
- Never enter charging mode
- Stay partially powered
- Drain battery continuously
Dust covering the sensor can also confuse readings.
Wiring and Connection Failure
Vibration, heat expansion, and corrosion can loosen wires over time.
Symptoms include:
- Intermittent charging
- Flickering operation
- Charging only when moved
DIY Inspection Checklist
Open the housing and check for:
- Green or white corrosion residue
- Loose connectors
- Burn marks
- Broken solder joints
- Condensation droplets
Dry components fully before reassembly.
Fixing Minor Electrical Issues
You can often restore function by:
- Cleaning contacts with isopropyl alcohol
- Tightening connectors
- Reseating wires
- Replacing damaged seals
If circuit boards show severe corrosion, replacement is safer than repair.
Environmental Factors That Affect Charging Performance
Beyond the three main causes, environmental conditions also influence charging.
Temperature Extremes
Cold weather reduces battery efficiency.
In winter:
- Charging slows dramatically
- Runtime shortens
- Lamps may appear nonfunctional
Bringing lamps indoors during freezing conditions can preserve batteries.
Installation Height and Orientation
Higher placement often receives better sunlight exposure but stronger wind and rain.
Balance exposure and protection carefully.
Artificial Lighting Interference
Streetlights or porch lights can confuse sensors, preventing proper nighttime activation and draining stored energy.
Place lamps away from constant nighttime lighting.
Preventive Maintenance for Long-Term Charging Performance
A small maintenance routine prevents most charging failures.
Monthly
- Clean solar panel
- Inspect housing
- Remove insect debris
Every 3–6 Months
- Check battery compartment
- Test runtime
- Inspect seals
Annually
- Replace rechargeable battery if performance declines
- Check wiring connections
Consistency dramatically extends lifespan.
Common Mistakes That Stop Solar Lamps from Charging
Avoid these frequent errors:
- Installing in shaded decorative areas
- Leaving protective plastic film on panel
- Using incorrect replacement batteries
- Blocking ventilation holes
- Storing lamp fully discharged
Many “defective” lamps simply suffer from installation mistakes.
When Replacement Makes More Sense Than Repair
Consider replacing the unit if:
- Solar panel surface is cracked
- Circuit board is heavily corroded
- Housing is brittle from UV exposure
- Charging stops repeatedly after repairs
Modern solar lamps are often more energy-efficient and durable.
How to Choose a Better Solar Mosquito Lamp Next Time
Look for features such as:
- Monocrystalline solar panels
- Replaceable batteries
- Waterproof rating (IPX5 or higher)
- Separate solar panel design
- Efficient LED attraction wavelengths
These features reduce future charging issues.
Final Thoughts: Most Charging Problems Are Fixable
When a solar outdoor mosquito killer lamp stops charging, it rarely means the device has reached the end of its life.
In most cases, the problem comes down to three core causes:
- Insufficient usable sunlight reaching the panel
- Battery aging or damage
- Internal electrical or sensor issues
By systematically checking each area, cleaning components, optimizing placement, and replacing inexpensive parts, you can often restore full functionality in less than an hour.
Solar mosquito lamps are simple systems built around predictable principles. Once you understand how energy flows from sunlight to stored power to nighttime operation, troubleshooting becomes straightforward.
Instead of discarding a non-charging lamp, a little investigation and DIY effort can bring it back to life — saving money, reducing waste, and keeping your outdoor space comfortable and mosquito-free for seasons to come.


