
From itchy bites and sleepless nights to the spread of mosquito-borne diseases, these tiny pests have driven humans to invent countless control methods—sprays, coils, electric zappers, and chemical repellents. Many of these solutions work, but they often come with downsides: toxic chemicals, recurring costs, and environmental impact.
What if you could fight mosquitoes using materials you already have at home?
Welcome to the world of DIY mosquito lamps—a creative, low-cost, and environmentally friendly approach to mosquito control that combines basic science with sustainability.
This guide will walk you through the principles, materials, step-by-step builds, safety tips, and real-world limitations of DIY mosquito lamps—so you can decide whether building your own is right for you.
1. Why DIY Mosquito Lamps Are Gaining Popularity
1.1 The Shift Toward Low-Cost, Sustainable Living
As more households embrace:
-
Minimalism
-
Recycling
-
Eco-conscious lifestyles
DIY solutions are no longer seen as inferior—they’re seen as smart.
A DIY mosquito lamp offers:
-
Extremely low cost
-
Reduced waste
-
No chemical smoke
-
Hands-on learning
For families, renters, students, and outdoor enthusiasts, DIY mosquito lamps are especially appealing.
1.2 When Store-Bought Solutions Fall Short
Commercial mosquito products often:
-
Require frequent replacement
-
Rely on chemicals
-
Are designed for mass use, not specific environments
DIY solutions allow you to:
-
Customize size and power
-
Experiment with placement
-
Understand what actually attracts mosquitoes
2. Understanding the Science Behind Mosquito Attraction
Before building anything, it’s important to understand why mosquitoes behave the way they do.
Mosquitoes are attracted to a combination of signals:
2.1 Light (But Not All Light)
Contrary to popular belief:
-
Mosquitoes are not strongly attracted to UV light alone
-
They respond better to certain wavelengths combined with other cues
However, light can still play a supporting role in attraction.
2.2 Carbon Dioxide (CO₂)
Mosquitoes are highly sensitive to CO₂:
-
Humans exhale it constantly
-
It signals the presence of a living host
This is why DIY traps often use yeast and sugar to generate CO₂.
2.3 Heat, Odor, and Airflow
Mosquitoes also respond to:
-
Body heat
-
Sweat-related odors
-
Gentle air movement
DIY mosquito lamps often mimic one or two of these signals—not all.
3. What Makes a DIY Mosquito Lamp Different from Commercial Ones?
DIY mosquito lamps usually:
-
Focus on attraction + trapping
-
Use passive killing methods
-
Avoid high-voltage electric grids
Instead of zapping mosquitoes instantly, many DIY designs:
-
Lure them in
-
Trap them
-
Prevent escape
This approach is quieter, safer, and more energy-efficient.
4. Core Materials You Can Reuse at Home
One of the biggest advantages of DIY mosquito lamps is material reuse.
Common household items include:
-
Empty plastic bottles (1–2 liter)
-
Old USB fans
-
LED bulbs or strips
-
USB cables or power banks
-
Mesh screens or netting
-
Black tape or paint
-
Sugar, yeast, and warm water
Most builds cost less than a few dollars if you already have these items.
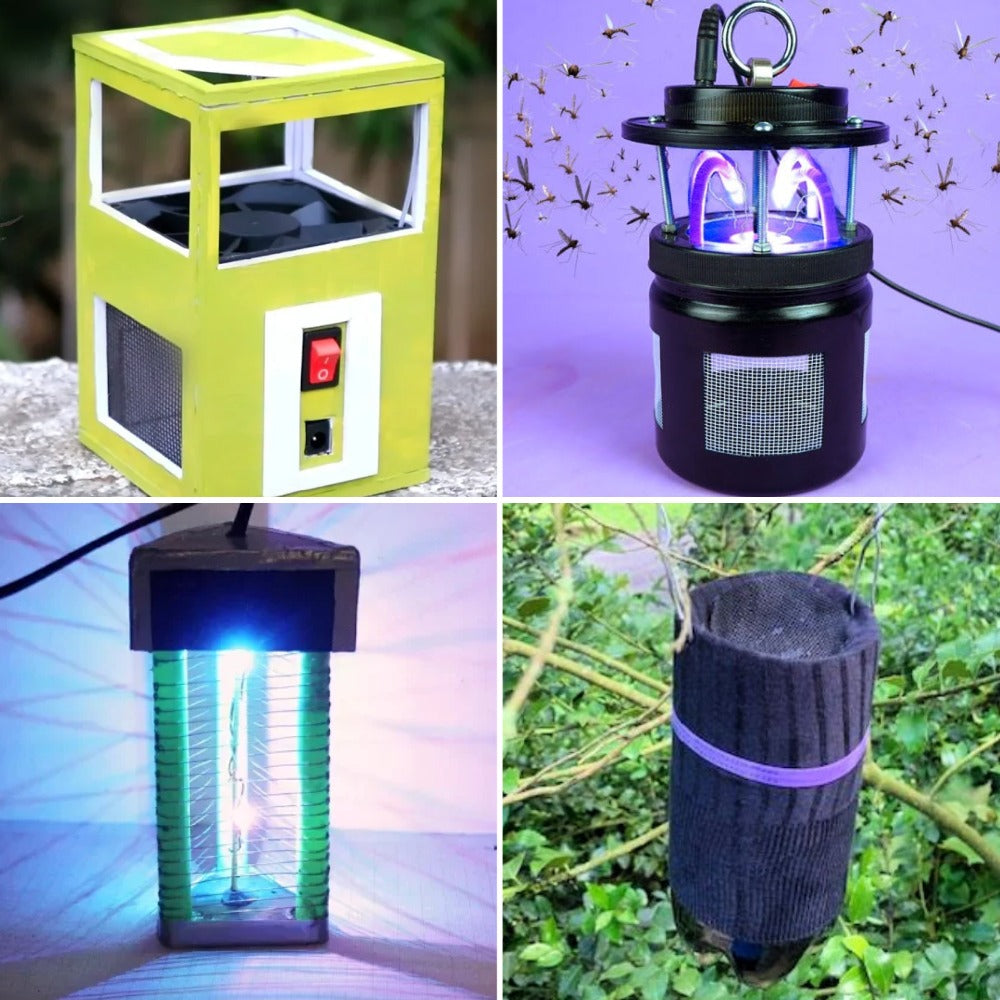
5. DIY Mosquito Lamp Build #1: The Bottle CO₂ Trap Lamp
5.1 How It Works
This design uses:
-
CO₂ from yeast fermentation
-
A simple funnel trap
-
Optional LED light for visual attraction
Mosquitoes enter but cannot escape.
5.2 Materials Needed
-
1 empty plastic bottle
-
Scissors or utility knife
-
1 cup warm water
-
2 tablespoons sugar
-
½ teaspoon dry yeast
-
Black paper or tape
-
Optional LED light
5.3 Step-by-Step Instructions
-
Cut the bottle in half
-
Invert the top portion to create a funnel
-
Mix sugar and warm water in the bottom
-
Add yeast (do not stir)
-
Insert the funnel top-down
-
Seal edges with tape
-
Wrap the bottle in black paper
-
Place in a mosquito-prone area
The mixture releases CO₂ for several days.
5.4 Pros and Cons
Pros
-
Extremely cheap
-
No electricity required
-
Safe for kids and pets
Cons
-
Limited range
-
Needs regular refilling
-
No instant kill
6. DIY Mosquito Lamp Build #2: USB Fan Trap Lamp
6.1 How It Works
This design:
-
Uses light to attract mosquitoes
-
Pulls them in with airflow
-
Traps them inside a mesh container
This method is more active and effective indoors.
6.2 Materials Needed
-
Small USB fan
-
LED light (cool white or blue)
-
Mesh fabric
-
Cardboard or plastic housing
-
USB power source
6.3 Assembly Steps
-
Mount the fan facing inward
-
Install LED light near the intake
-
Create a mesh trap behind the fan
-
Seal gaps to prevent escape
-
Power via USB
Mosquitoes are drawn in and dehydrated over time.
6.4 Pros and Cons
Pros
-
Reusable
-
No chemicals
-
Quiet operation
Cons
-
Requires electricity
-
Not ideal for outdoor use in wind
7. DIY UV-Based Lamps: What You Need to Know
Some DIY builders attempt UV-based mosquito lamps.
Important reality check:
-
UV alone is not highly effective for mosquitoes
-
It attracts many non-target insects
If using UV:
-
Choose low-power LEDs
-
Combine with airflow trapping
-
Avoid exposure to eyes and skin
DIY UV lamps should be enclosed and shielded.
8. Safety Considerations You Should Never Ignore
DIY does not mean careless.
8.1 Electrical Safety
-
Use low-voltage USB power
-
Avoid exposed wiring
-
Keep devices away from moisture
8.2 UV Light Safety
-
Never look directly at UV-C light
-
Avoid open UV exposure
-
Prefer enclosed designs
8.3 Placement Safety
-
Keep out of reach of children
-
Avoid placing near sleeping faces
-
Do not block airflow
9. How Effective Are DIY Mosquito Lamps—Really?
DIY mosquito lamps:
-
Work best in small, controlled spaces
-
Reduce mosquito presence, not eliminate it
-
Require proper placement and patience
They are ideal for:
-
Bedrooms
-
Balconies
-
Desks
-
Camping tents
They are not a replacement for:
-
Large outdoor control systems
-
Severe infestation management
10. Environmental Benefits of DIY Mosquito Lamps
10.1 Reduced Waste
-
Reuses plastic bottles
-
Extends life of old electronics
-
Reduces disposable product use
10.2 Zero Chemical Pollution
-
No smoke
-
No insecticides
-
No residue
This is especially important for:
-
Homes with pets
-
Children
-
Indoor air quality
11. DIY vs Commercial Mosquito Lamps: A Fair Comparison
| Factor | DIY Lamp | Commercial Lamp |
|---|---|---|
| Cost | Very low | Medium |
| Customization | High | Low |
| Effectiveness | Moderate | Higher |
| Environmental Impact | Very low | Low |
| Ease of Use | Medium | High |
DIY is about learning and sustainability, not perfection.
12. Tips to Improve DIY Lamp Performance
-
Combine with window screens
-
Eliminate standing water nearby
-
Use multiple small traps instead of one large one
-
Place away from human sleeping areas
-
Clean and reset regularly
Mosquito control works best as a system, not a single device.
Final Thoughts: DIY as a Mindset, Not Just a Project
DIY mosquito lamps won’t replace every commercial solution—but they represent something bigger.
They show that:
-
You don’t always need chemicals to solve problems
-
Waste can become a resource
-
Simple science can improve daily life
In a world of disposable convenience, building your own low-cost mosquito lamp is a small but meaningful step toward sustainability, self-reliance, and smarter living.
Sometimes, the best solutions are the ones you build yourself.


