When winter arrives, aquarium owners in cold climates face an important challenge: keeping water temperatures stable without spending a fortune on heating equipment. A sudden drop in room temperature, a draft near a window, or a power outage can put tropical fish at risk. Even aquariums in moderately heated homes may lose heat faster than expected, particularly when placed near exterior walls or poorly insulated windows.
Fortunately, you do not always need expensive aquarium accessories to improve heat retention. Common household materials, including foam boards, bubble wrap, towels, cardboard, and reflective insulation, may help slow heat loss when used correctly.
But how effective are these DIY materials? Is a thick layer of foam board better than several layers of bubble wrap? Can an old blanket keep aquarium water warm overnight? Does reflective insulation make a meaningful difference, or is it simply another product that looks promising?
The answers depend on the material, the aquarium's design, the surrounding environment, and how the insulation is installed.
In this guide, we will examine how different DIY aquarium insulation materials work, explain how to test their performance at home, compare their strengths and weaknesses, and show you how to create a practical winter insulation system without compromising fish health.
1. Why Aquarium Insulation Matters in Winter
Aquariums are constantly exchanging heat with their surroundings. Even when an aquarium heater maintains the desired temperature, heat escapes through the glass, the water surface, the substrate, and other exposed components.
The heater must replace that lost energy to maintain a stable environment.
When the surrounding air becomes colder, the temperature difference between the aquarium water and the room increases. This generally increases heat loss, although the actual rate also depends on airflow, exposed surface area, humidity, and the construction of the aquarium.
For example, a tropical aquarium maintained at 78°F may lose heat more quickly in a room at 60°F than in a room at 72°F, assuming other conditions remain similar.
Several factors influence how quickly an aquarium loses heat.
The glass walls
Glass provides a clear view of the aquarium, but it is not an especially effective thermal insulator. Heat can move from the warm water through the glass and into the surrounding air.
Large aquariums have more exposed surface area than small aquariums, but their greater water volume also gives them more thermal mass. Consequently, a small aquarium can experience rapid temperature changes even though it may lose less total heat than a large tank.
The water surface
The open water surface is another major route for heat loss. Evaporation removes energy from the water, while air movement can increase heat exchange.
A properly fitted aquarium lid can reduce evaporation and limit heat loss. However, the effect depends on the lid design, ventilation, and the aquarium's temperature.
A tight lid is not always appropriate for every setup, particularly where gas exchange or equipment clearance is a concern.
The aquarium stand and bottom
An aquarium placed on a cold stone surface, an uninsulated stand, or a poorly insulated floor may lose heat through its base. A suitable insulating mat beneath the aquarium can reduce conductive heat transfer, but it must be compatible with the aquarium's construction and weight distribution.
Never place soft, uneven, or improvised materials beneath a filled aquarium unless the tank manufacturer or a qualified aquarium professional confirms that the support arrangement is safe.
Room temperature and drafts
An aquarium positioned beside an exterior door, a drafty window, or an unheated garage wall may experience greater heat loss than one located in a stable interior room.
Before purchasing materials, consider moving the aquarium away from cold windows, exterior doors, heating vents, and direct sunlight.
The most effective insulation strategy usually combines several small improvements rather than relying on one material alone.
2. How Aquarium Insulation Works
Before comparing materials, it helps to understand three basic methods of heat transfer.
Conduction occurs when heat moves through a material, such as glass, foam, or a metal bracket.
Convection occurs when moving air or water carries heat away. Drafts can increase heat loss around exposed aquarium surfaces.
Radiation occurs when surfaces exchange thermal energy through electromagnetic waves. Reflective insulation may reduce some radiant heat transfer when installed appropriately, but its effectiveness depends on the surrounding conditions.
Different DIY materials address these processes in different ways.
Foam board contains trapped gas within a cellular structure, making it effective at slowing conductive heat transfer. Bubble wrap traps air inside individual pockets, which can also reduce heat transfer. Towels and blankets hold air within their fibers, while reflective materials can reduce radiant heat exchange under suitable conditions.
However, the material's performance depends on more than its advertised properties.
Thickness, gaps, compression, moisture, coverage, and installation quality all matter. A thick piece of insulation with large uncovered areas may perform worse than a thinner material installed carefully across the most exposed surfaces.
It is also important to distinguish between insulating the aquarium and heating it.
Insulation slows temperature change; it does not generate heat. If the water is already too cold, wrapping the tank will not warm it back to the correct temperature. A functioning, appropriately sized heater remains essential for most tropical aquariums.
3. Testing Foam Board for Aquarium Insulation
Foam board is one of the most promising DIY materials for improving aquarium heat retention.
Common options include expanded polystyrene (EPS), extruded polystyrene (XPS), and other rigid foam insulation products. These materials are widely used in building insulation because their cellular structures reduce heat transfer.
For aquarium applications, rigid foam board offers several advantages.
It is relatively lightweight, easy to cut, and available in different thicknesses. It also maintains its shape better than soft fabrics and can cover large areas without requiring multiple layers.
How effective is foam board?
Foam board generally provides good insulation relative to its thickness. A properly fitted panel can reduce heat transfer through the covered glass wall, especially when the aquarium sits in a cold room.
Thicker foam board typically provides greater thermal resistance than thinner board of the same type, although the improvement depends on the product's actual insulation rating and installation.
For a DIY aquarium project, a thin panel may be sufficient to improve heat retention without making the tank difficult to access.
A thicker panel may be useful during particularly cold weather or in rooms with substantial temperature fluctuations.
How to install foam board
Start by measuring the aquarium's rear glass panel and, if needed, its side panels.
Cut the foam board to fit the exterior dimensions. Keep the panel outside the aquarium, and attach it using a secure, aquarium-safe arrangement that does not place pressure on the glass.
Avoid blocking filters, air pumps, heater controls, electrical connections, or other equipment that requires airflow or access.
For a simple winter setup, insulating the rear panel and the side facing the coldest wall is a practical starting point. You can then monitor water temperature and decide whether additional coverage is worthwhile.
Foam board can also be placed behind an aquarium to create a thermal barrier between the glass and a cold exterior wall. Ensure the aquarium remains properly supported and that the insulation does not interfere with its stand or structural requirements.
Advantages of foam board
-
Strong insulating performance relative to its thickness.
-
Easy to cut and fit around aquarium dimensions.
-
Relatively inexpensive for the area covered.
-
Reusable across multiple winters.
-
Less likely than absorbent fabrics to retain water when kept dry.
Disadvantages of foam board
-
It can look bulky or unattractive in a display aquarium.
-
Some products crumble, dent, or break when handled roughly.
-
It can obstruct visibility if placed on the front panel.
-
It must be secured so it cannot fall or create pressure against the glass.
-
Some foam products contain coatings, adhesives, or additives unsuitable for direct contact with aquarium water.
Never assume that building insulation is safe to immerse in an aquarium. Keep foam board on the outside, away from fish, and prevent loose particles from entering the water.
Best use
Foam board is particularly useful for aquariums in cold rooms, basement fish rooms, garages, and locations near exterior walls.
For many aquarium owners, it is a strong first choice for reducing heat loss through the rear and side panels.
4. Does Bubble Wrap Really Help?
Bubble wrap is another popular DIY insulation option because it is inexpensive, widely available, and easy to cut.
Its insulating effect comes from the air trapped inside the bubbles. Air is a relatively poor conductor of heat, and the small pockets can reduce heat transfer compared with an equivalent arrangement that allows unrestricted movement of air.
However, bubble wrap is not a direct substitute for rigid insulation.
How bubble wrap performs
Bubble wrap can provide a useful insulating layer when placed over the exterior of aquarium glass. It is especially convenient for short-term use because it requires little preparation.
Several factors affect its performance.
First, the bubble size and material thickness influence how much air is trapped within the sheet. Second, multiple layers may improve insulation, but the benefit is not necessarily proportional to the number of layers. Third, gaps between the wrap and the aquarium can affect heat transfer.
Most importantly, bubble wrap must be installed securely. A loose sheet that shifts or falls away from the aquarium may provide inconsistent coverage.
Is one layer enough?
One layer can help, particularly when the aquarium is exposed to cold air. Additional layers may improve performance, but they also make the setup bulkier and may trap moisture against the glass.
The best approach is to test one layer first, measure the result, and add another layer only if it produces a worthwhile improvement.
Do not assume that five layers will automatically perform better than a well-fitted foam board panel. Different materials have different thermal resistance, and installation quality can be just as important as material quantity.
How to install bubble wrap
Measure the outside of the aquarium's rear and side panels. Cut bubble wrap to the appropriate dimensions, leaving openings for equipment and maintenance access.
Secure it with an arrangement that keeps it outside the aquarium and prevents it from slipping into the water.
Avoid adhesive tape that may leave residue on the glass or damage aquarium seals. Do not wrap the entire aquarium so tightly that you obstruct ventilation, electrical equipment, or access to the heater.
Bubble wrap should not cover aquarium lights in a way that traps heat, nor should it interfere with equipment that requires airflow.
Advantages of bubble wrap
-
Very affordable and widely available.
-
Quick to install and remove.
-
Lightweight and easy to cut.
-
Useful for temporary cold spells.
-
Suitable for testing different coverage arrangements.
Disadvantages of bubble wrap
-
Usually less rigid and durable than foam board.
-
Can tear or flatten during repeated use.
-
May look untidy around a display tank.
-
Can trap condensation against cold glass.
-
Performance varies according to bubble size, thickness, and installation.
Best use
Bubble wrap is a reasonable short-term option for a temporary temperature drop, an emergency insulation kit, or an aquarium that needs modest additional protection.
For a permanent winter setup, foam board is often easier to keep neatly fitted.
5. Can Towels and Blankets Keep an Aquarium Warm?
Old towels, fleece blankets, and other household fabrics are tempting alternatives because most people already have them.
Textiles trap air between their fibers, which helps slow heat transfer. A thick, dry blanket can therefore provide some insulation when draped around the exterior of an aquarium.
Nevertheless, fabrics come with practical limitations.
What makes fabric insulation useful?
A thick towel or fleece blanket can cover irregular surfaces without requiring precise cutting. This makes it convenient for emergency use when temperatures unexpectedly fall.
Fabrics are also flexible enough to cover several aquarium panels at once.
However, their insulating performance varies greatly. A thin cotton towel, a thick fleece blanket, and a compressed wool blanket do not behave identically.
Moisture also matters. Wet fabric can lose insulating effectiveness and may encourage mold or mildew.
Why fabric may be a poor permanent solution
Aquariums naturally produce humidity. Water can condense on cooler surfaces, particularly in poorly ventilated rooms or when the tank is exposed to cold air.
A blanket placed tightly against damp glass can absorb this moisture. If it remains wet, it may develop unpleasant odors, harbor mold, or damage nearby furniture.
Loose fabric can also fall over electrical equipment or obstruct ventilation around heaters, filters, and lighting systems.
For these reasons, fabric is best treated as a temporary supplement rather than the default permanent insulation material.
Safer use of towels and blankets
If you use a towel or blanket, place it around the exterior sides of the aquarium while keeping the top, equipment, and electrical components accessible.
Never drape fabric over a heater controller, power strip, plug, or other component that could overheat or become wet.
Do not cover the aquarium so extensively that you cannot monitor the water temperature or inspect the fish.
Remove the fabric regularly to check for condensation and dampness. If it becomes wet, take it off and dry the area before using it again.
Best use
Dry towels and blankets are most useful during a short cold spell or while waiting for a room's heating system to recover.
For routine winter protection, rigid foam board usually offers a neater and more moisture-resistant arrangement.
6. What About Cardboard?
Cardboard is an accessible DIY insulation material, but its effectiveness is often misunderstood.
Corrugated cardboard contains fluted air spaces between paper layers. These spaces can slow heat transfer, making cardboard more useful than a single flat sheet of paper.
However, cardboard is sensitive to moisture and compression. Once wet, it can lose structural strength, deform, and become a breeding ground for mold.
Advantages of cardboard
Cardboard is free or inexpensive, easy to cut, and suitable for temporary experiments. It can be used to create a simple outer panel or to compare the effect of covering a previously exposed aquarium wall.
It is also convenient for testing different shapes before cutting more durable materials.
Limitations
Cardboard generally does not provide the same predictable insulation performance as purpose-made rigid foam board of comparable thickness.
Its performance also depends on corrugation, the number of layers, and whether the internal air spaces remain intact.
Cardboard should never be allowed to become damp or rest against electrical equipment. It should also be kept away from heat sources and used in a manner that does not create a fire hazard.
Best use
Cardboard is useful for low-cost experiments and very short-term applications in dry conditions. It is less suitable for permanent aquarium insulation, especially in humid rooms.
7. Does Reflective Insulation Make a Difference?
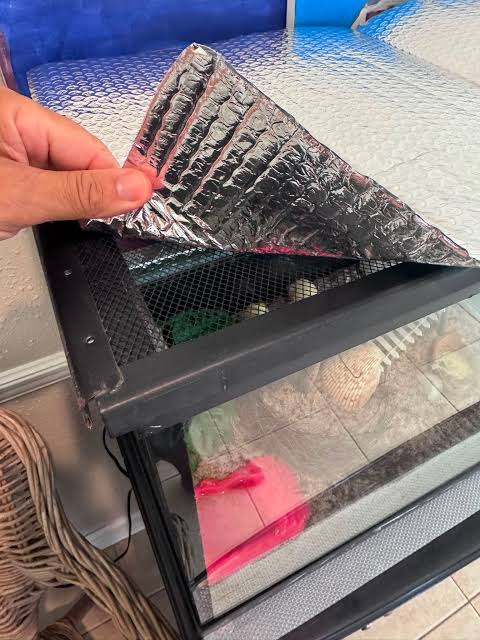
Reflective insulation products often contain a metallic-looking surface, sometimes combined with foam or bubble layers.
They are designed to reduce certain forms of radiant heat transfer. However, their effectiveness depends on how they are installed.
A reflective surface generally works best when it faces an appropriate air space. If it is pressed directly against another material, its ability to reduce radiant heat transfer may be limited.
This is why reflective foil should not automatically be considered superior to foam board simply because it looks more advanced.
Reflective foil alone
A thin reflective sheet has little insulating value against conductive heat transfer by itself. Its main potential benefit comes from reducing radiant heat exchange under suitable conditions.
For an aquarium, where heat transfer through glass and the surrounding air is important, a thin sheet of foil may provide less benefit than expected.
Reflective bubble insulation
Reflective bubble products combine trapped air with a reflective surface. Their performance depends on the product's construction and whether the installation follows the manufacturer's recommendations.
Such materials may be useful when they provide a suitable insulating layer, but their performance should be evaluated against ordinary foam board rather than assumed from appearance alone.
Best use
Reflective insulation is worth considering when a suitable product is already available or when its construction makes it convenient for a particular installation.
For a straightforward DIY aquarium project, foam board is usually the simpler baseline material against which other options can be tested.
8. Comparing DIY Aquarium Insulation Materials
The following comparison summarizes the practical differences between common household materials.
| Material | Insulating potential | Moisture resistance | Ease of installation | Best application |
|---|---|---|---|---|
| Rigid foam board | Generally high for its thickness | Good when kept dry | Easy | Long-term winter insulation |
| Bubble wrap | Moderate; varies by product | Relatively good, but condensation may occur | Very easy | Temporary insulation |
| Thick fleece blanket | Variable | Low to moderate | Very easy | Short-term cold spells |
| Corrugated cardboard | Variable, often limited by thickness and moisture | Poor | Easy | Temporary experiments |
| Reflective foil alone | Limited without a suitable air space | Generally good | Easy | Specialized applications |
| Reflective bubble insulation | Product-dependent | Product-dependent | Easy to moderate | Alternative insulation layer |
| Aquarium lid | Helps reduce evaporation and surface heat loss | Designed for aquarium use | Easy when properly fitted | Routine heat retention |
These are qualitative comparisons, not laboratory measurements or a universal ranking.
Actual performance depends on material thickness, thermal conductivity, coverage, air movement, aquarium dimensions, and the temperature difference between the water and its surroundings.
A thick, well-fitted layer of one material may outperform a thin, poorly fitted layer of another.
The only reliable way to determine which option works best for your specific aquarium is to test it under controlled conditions.
9. How to Test Aquarium Insulation at Home
You do not need a laboratory to compare DIY insulation materials. A simple experiment using a thermometer and consistent measurement intervals can reveal whether a particular setup helps your aquarium retain heat.
However, you should perform the comparison without exposing live fish to unsafe temperatures.
The safest approach is to use a separate test container or an empty aquarium rather than experimenting on fish that depend on stable water conditions.
Equipment needed
Prepare the following items:
-
A thermometer with suitable accuracy and resolution.
-
A clean container or spare aquarium of known volume.
-
A controlled heat source, such as a suitable aquarium heater.
-
A timer or clock.
-
Foam board, bubble wrap, and any other materials you want to compare.
-
A notebook or spreadsheet for recording temperatures.
-
A room thermometer to monitor ambient conditions.
If you have two identical containers, you can compare materials simultaneously. Otherwise, conduct separate trials under closely matched conditions.
Step 1: Standardize the test setup
Use the same container, water volume, starting water temperature, and measurement location for each trial.
For example, you might use a test container holding 5 gallons of water and begin each experiment at 78°F.
This is an illustrative test condition, not a recommended temperature for every fish species.
Keep the container away from sunlight, open windows, heating vents, and other sources of temperature fluctuation.
If you use a heater, ensure it is suitable for the test volume and follow the manufacturer's instructions.
Step 2: Establish a baseline
Begin with no additional insulation.
Record the starting water temperature and room temperature. Then record both measurements at regular intervals, such as every 30 minutes.
For a cooling test, use a safe, controlled setup without live fish and without an active heater if the test is specifically intended to measure passive heat loss.
The water should begin at the same temperature in every trial. The room conditions should also remain as consistent as possible.
Continue long enough to observe a meaningful temperature change, while avoiding unnecessary heating or cooling hazards.
Step 3: Test foam board
Repeat the experiment using foam board on the rear and side panels.
Keep the top configuration identical to the baseline. If the baseline container had a lid, retain the same lid throughout the test.
This is important because an uncovered container may lose heat much faster than a covered one, making the insulation comparison unreliable.
Record the temperature at the same intervals and note any changes in room temperature.
Step 4: Test bubble wrap
Remove the foam board and repeat the trial using bubble wrap in the same locations.
Use one layer initially. If you want to test multiple layers, conduct an additional trial rather than changing the setup midway through the experiment.
Keep the exposed surface area and top coverage consistent.
Step 5: Test other materials
Repeat the procedure for towels, cardboard, reflective insulation, or any other materials you want to evaluate.
Make sure each material covers approximately the same area. Otherwise, you may be measuring the effect of coverage rather than the material itself.
If possible, repeat each test at least twice. Repeated trials help reveal whether an apparent improvement is consistent or simply reflects changing room conditions.
Step 6: Calculate the temperature drop
Suppose the water starts at 78°F and ends at 75°F after four hours.
The temperature drop is:
78°F − 75°F = 3°F.
If another test begins at the same temperature and ends at 76.5°F, the drop is only 1.5°F.
Under otherwise comparable conditions, the second setup retained heat better over that period.
These numbers are hypothetical examples to demonstrate the calculation, not measured results for any particular material.
Step 7: Compare the cooling rate
A useful way to compare the results is to calculate the average temperature drop per hour.
For example:
-
Baseline: 3°F over four hours = 0.75°F per hour.
-
Insulated setup: 1.5°F over four hours = 0.375°F per hour.
The second setup cooled at half the average rate in this illustrative example.
However, cooling is not always linear. The rate of heat loss generally changes as the water temperature approaches the surrounding temperature.
For this reason, compare complete temperature records whenever possible instead of relying on a single reading.
Step 8: Control experimental errors
Several factors can distort the results.
A different starting temperature changes the temperature difference between the water and the room. A different water volume changes the system's thermal mass. An uncovered container can lose more heat through evaporation.
Even thermometer placement matters. A thermometer near a heater or close to a container wall may not represent the average water temperature.
To improve accuracy:
-
Use the same thermometer throughout the experiment.
-
Measure at the same depth and location.
-
Keep water volume and container dimensions consistent.
-
Maintain similar room conditions.
-
Keep the lid and other equipment unchanged.
-
Avoid moving the test container between locations.
-
Record ambient temperature at every measurement.
-
Repeat trials before drawing conclusions.
For more meaningful comparisons, you can also use a second thermometer to measure the air immediately around the container.
10. How to Calculate the Improvement in Heat Retention
Temperature records can help you compare different insulation arrangements more systematically.
First, calculate the temperature drop for each trial.
Then compare the insulated trial with the baseline over the same period.
A simple relative reduction in temperature drop can be calculated as follows:
[
\text{Reduction}=
\frac{D_b-D_i}{D_b}\times100%
]
Here, (D_b) is the baseline temperature drop and (D_i) is the insulated temperature drop.
Suppose the baseline loses 3°F while the insulated setup loses 2°F over the same period.
[
\frac{3-2}{3}\times100%=33.3%
]
In this example, the insulated setup reduced the observed temperature drop by approximately 33%.
This does not mean that the material reduces total heat loss by exactly 33% under all conditions. It means the temperature drop was 33% smaller in that particular experiment.
A water container's temperature response depends on its thermal mass, exposed surface area, room conditions, and other factors. A single experiment cannot establish a universal insulation rating.
If you want to compare the energy efficiency of a heated aquarium, a different test is useful: measure heater runtime or electricity consumption while maintaining the same target temperature under comparable ambient conditions.
That method can help estimate how much work the heater must perform to maintain the aquarium's temperature.
11. Does Insulating the Back and Sides Work Better Than Insulating the Top?
The answer depends on the aquarium's design and the conditions around it.
Side panels lose heat through conduction and convection. The water surface loses heat through several mechanisms, including evaporation and convection.
Consequently, a lid can be particularly useful when evaporation is substantial.
However, an insulated rear panel may provide a larger improvement than a lid in some setups, particularly when the aquarium has a large rear surface exposed to cold air.
There is no universal rule that one surface must always be insulated first.
Start with the largest practical opportunities
For most home aquariums, a sensible order is:
-
Reduce drafts around the aquarium.
-
Make sure the aquarium has an appropriate lid.
-
Insulate the rear panel if it faces a cold wall or room.
-
Add insulation to exposed side panels if needed.
-
Consider bottom insulation only when it can be installed safely and the support arrangement remains appropriate.
This sequence emphasizes low-risk changes before more elaborate modifications.
Should you cover the front glass?
For a display aquarium, covering the front glass is usually inconvenient because it prevents observation and reduces visibility.
However, a temporary insulating panel on the front may be useful during an emergency when the aquarium is in an exceptionally cold environment.
If you cover the front, make sure you can remove the panel quickly to inspect the fish, check the temperature, and access equipment.
Do not sacrifice regular observation for a small potential improvement in heat retention.
12. Does an Aquarium Lid Make DIY Insulation More Effective?
A suitable lid is often one of the most practical ways to improve aquarium heat retention.
The open water surface allows evaporation, and evaporation consumes energy. By reducing evaporation, a well-fitted lid can reduce one route of heat loss.
A lid may also reduce the effect of drafts moving across the water surface.
However, lids are not interchangeable. Glass covers, plastic covers, mesh lids, and partially covered tops have different properties.
The correct design depends on the fish species, equipment, lighting, and ventilation needs.
Choose a suitable lid
Use a lid designed for the aquarium whenever possible. Ensure it does not interfere with filter outlets, airline tubing, lighting, or other equipment.
Leave any ventilation openings required by the aquarium's design.
Do not seal the aquarium in an attempt to eliminate every possible source of heat loss. Fish need adequate gas exchange, and some setups require more ventilation than others.
Monitor condensation
Condensation may form on the underside of a lid when warm, humid air contacts a cooler surface.
Some condensation is normal, but excessive moisture can affect electrical equipment or drip onto nearby surfaces.
Check the lid, lighting, and power connections regularly. Keep electrical components dry and follow manufacturer instructions for clearance and ventilation.
A properly fitted lid combined with exterior foam board can be a useful winter arrangement, provided the setup remains safe and adequately ventilated.
13. How to Build a Low-Cost DIY Aquarium Insulation System
For aquarium owners who want a practical solution rather than a complicated experiment, a simple system can be assembled with readily available materials.
The goal is not to wrap every part of the aquarium indiscriminately. Instead, identify the most exposed surfaces and insulate them without interfering with equipment.
Materials
You may need:
-
Rigid foam board.
-
A measuring tape.
-
A suitable cutting tool.
-
A stable, aquarium-safe fastening method.
-
An appropriate aquarium lid.
-
A reliable thermometer.
-
Moisture-resistant storage for reusable insulation.
The exact quantities depend on the aquarium's dimensions and the number of panels you intend to cover.
Step 1: Measure the aquarium
Measure the rear and side glass panels.
Check for protruding filter components, cables, air tubing, and brackets. Your insulation panels should fit around these items without squeezing them or obstructing access.
Step 2: Cut the panels
Cut the foam board slightly to match the intended coverage area.
Make clean cuts and remove loose particles before installation.
Do not force a panel into a tight space. Pressure against aquarium glass can create an unnecessary risk of damage.
Step 3: Attach the insulation
Secure the panels so they remain outside the aquarium and cannot fall.
Avoid adhesives that could damage silicone seams, leave difficult-to-remove residue, or release unsuitable chemicals near the water.
Do not use the aquarium's electrical cables or equipment as attachment points.
Step 4: Inspect the top
Check whether the aquarium has an appropriate lid and whether it is functioning correctly.
Do not cover the top with foam board or fabric in a way that traps heat around lighting or blocks necessary ventilation.
Step 5: Monitor temperatures
Record the aquarium's normal temperature and room temperature before adding insulation.
After installation, continue monitoring both. If the water temperature remains stable for longer or the heater operates less frequently under similar conditions, the insulation may be helping.
Avoid assuming that every temperature change is caused by the insulation. Room heating, sunlight, filter flow, heater cycling, and water changes can all influence the results.
Step 6: Inspect regularly
Look for condensation, dampness, loose panels, damaged cables, or restricted equipment access.
Remove the insulation periodically to inspect the glass and surrounding area.
A good DIY insulation system should make aquarium care easier, not create a hidden maintenance problem.
14. Common Mistakes When Insulating an Aquarium
Even inexpensive materials can cause problems when installed carelessly.
Avoid the following mistakes when preparing your aquarium for winter.
Mistake 1: Wrapping the aquarium completely
Wrapping the entire aquarium with thick insulation may seem like the most effective strategy, but it can obstruct ventilation, conceal leaks, and prevent you from observing the fish.
It may also trap moisture around electrical equipment.
Insulate selected exterior surfaces rather than covering the aquarium indiscriminately.
Mistake 2: Using insulation as a replacement for a heater
Insulation slows heat loss but does not supply heat.
If the aquarium water is below the appropriate temperature for its inhabitants, insulation alone will not restore the correct conditions.
Use a suitable aquarium heater and monitor its performance.
Mistake 3: Ignoring the heater's condition
An aging, undersized, or malfunctioning heater may struggle to maintain the target temperature in cold weather.
Check the heater, thermostat, electrical connections, and temperature readings. If the heater runs continuously without maintaining the desired temperature, investigate the problem rather than simply adding more insulation.
Mistake 4: Using unsuitable adhesives
Some adhesives, coatings, and insulation products may be inappropriate near aquariums.
Keep building materials outside the tank and choose fastening methods that do not damage the aquarium's seals.
Never introduce materials into aquarium water unless they are specifically suitable for that purpose.
Mistake 5: Ignoring moisture
Condensation can accumulate behind insulation, particularly near cold walls.
Inspect the area regularly and allow damp surfaces to dry. Replace wet fabric and damaged cardboard rather than leaving them in place.
Mistake 6: Assuming that more layers always mean better results
Additional insulation can help, but each layer adds cost and bulk.
The improvement may be small if most heat loss occurs through an uncovered surface or if the room itself is extremely cold.
Test one change at a time and use the results to decide whether additional materials are worthwhile.
Mistake 7: Forgetting about power outages
Insulation can slow cooling during an outage, but it cannot keep an aquarium warm indefinitely.
If winter storms are common in your area, prepare a broader emergency plan that includes temperature monitoring, safe backup power options, and a method for maintaining adequate oxygenation.
15. How DIY Insulation Helps During a Power Outage
A power outage presents a different challenge from normal winter operation.
When the aquarium heater stops working, the water begins losing stored heat to the surroundings. Insulation slows that process, potentially giving you more time to respond.
However, the actual cooling rate depends on the aquarium's water volume, starting temperature, room temperature, lid, and surrounding materials.
A small aquarium in a cold room may cool much faster than a large aquarium in a stable indoor environment.
What to do before an outage
Keep suitable insulation materials available before severe weather arrives.
Pre-cut foam board panels are especially convenient because they can be installed quickly without extensive preparation.
Maintain a reliable thermometer and consider a temperature alarm if your aquarium contains species that are particularly sensitive to temperature changes.
If outages are common, evaluate safe backup power options for essential equipment. Any electrical backup system must be appropriate for the equipment and used according to its instructions.
What to do during an outage
Keep doors and windows closed where practical, and reduce drafts around the aquarium.
Install exterior insulation on the rear and side panels while keeping equipment accessible.
If you use a blanket temporarily, keep it away from electrical connections and other heat-sensitive or moisture-sensitive components.
Avoid opening the aquarium unnecessarily, but continue checking the water temperature and fish behavior.
If filtration or aeration stops, remember that oxygen availability may become as important as temperature. Insulation does not solve either problem by itself.
Avoid sudden temperature changes
When power returns, do not assume that the water should immediately be heated as rapidly as possible.
Sudden temperature changes can stress fish. Restore appropriate heating and circulation while following species-specific guidance.
If the water has fallen substantially below the suitable range, seek advice from an experienced aquarist or aquatic veterinarian rather than making a drastic correction.
16. What Temperature Should You Maintain During Winter?
There is no single ideal aquarium temperature for every fish.
Many common tropical community fish are kept within a range around 75–80°F, but their requirements differ by species, life stage, health, and other environmental conditions.
Some tropical fish require warmer water, while temperate species may do better at cooler temperatures.
Goldfish, for example, generally have different temperature needs from many tropical aquarium fish. Certain species also tolerate seasonal variation better than others.
Before choosing an insulation strategy, identify the temperature range recommended for every species in the aquarium.
Stability matters
For many fish, maintaining a stable temperature within the appropriate range is more important than pursuing one exact number without considering species requirements.
Frequent fluctuations can cause stress. In addition, water temperature affects metabolism and dissolved oxygen availability.
Warmer water generally holds less dissolved oxygen than cooler water, which is another reason to maintain appropriate circulation and aeration.
Use a reliable thermometer
Do not rely exclusively on the heater's built-in thermostat.
A separate thermometer provides an independent reading and can help identify a malfunctioning heater.
Check temperatures regularly during cold weather, particularly overnight and during periods when the room's heating system may be reduced.
For sensitive species, an aquarium temperature controller or alarm may provide an additional layer of protection when properly installed.
17. Can DIY Insulation Reduce Electricity Costs?
Potentially, yes.
When an aquarium loses less heat, its heater may need to operate less frequently to maintain the same water temperature. Under suitable conditions, this can reduce electricity consumption.
However, the savings vary significantly between aquariums.
A small aquarium in a consistently warm room may experience little benefit. A larger tropical aquarium in a cold basement or garage may benefit more from insulating exposed surfaces.
The result also depends on heater efficiency, aquarium volume, lid design, and the temperature setting.
A simple way to estimate savings
If you have a plug-in electricity meter suitable for your heater and electrical setup, you may be able to measure energy consumption before and after insulation.
Compare the readings over similar periods while maintaining the same target water temperature.
Keep room temperature, lighting schedules, and other relevant conditions as consistent as possible.
Do not assume that a reduction in heater runtime translates directly into the same percentage reduction in the aquarium's total electricity consumption. Filters, lights, air pumps, and other equipment continue using energy.
For example, insulation might reduce heater energy use while having little effect on the aquarium's overall electricity bill if the heater accounts for only a small share of total consumption.
Consider the cost of materials
Foam board is often reusable for several winters. Bubble wrap may be cheaper initially but can become damaged with repeated handling.
When choosing materials, consider purchase cost, installation time, durability, storage space, and actual performance.
The best option is the one that produces a meaningful improvement without introducing new maintenance or safety problems.
18. Which DIY Material Should You Choose?
The best material depends on your aquarium, climate, budget, and whether you need a temporary or permanent solution.
Here are practical recommendations for common situations.
For long-term winter insulation
Choose rigid foam board for the rear and exposed side panels.
It provides a convenient balance of insulating potential, durability, and ease of installation. It can also be removed for cleaning and reused when winter returns.
Pair it with an appropriate aquarium lid when suitable for your setup.
For a sudden cold spell
Bubble wrap is a practical option when you need something lightweight and quick to install.
Use it on selected exterior surfaces and monitor the temperature to determine whether it is helping.
If foam board is already available, it may be equally or more convenient depending on the aquarium's shape.
For a temporary emergency
A dry towel or fleece blanket can provide additional insulation for a short period.
Keep it away from electrical equipment, inspect it for moisture, and ensure you can still monitor the aquarium.
For the lowest possible material cost
Cardboard can be useful for a short experiment in a dry environment.
However, it is less durable and more vulnerable to moisture than foam board. For repeated winter use, a purpose-made insulating panel is generally a more practical choice.
For specialized installations
Reflective insulation may be worth testing if you already have a suitable product or need a particular installation arrangement.
Its performance depends on the complete assembly, not merely the presence of a shiny surface.
For most aquarium owners, it is sensible to establish a foam board baseline before investing in more specialized materials.
19. A Practical Winter Aquarium Checklist
Use this checklist before temperatures drop.
-
Confirm the recommended temperature range for every fish species.
-
Test the aquarium heater and verify its readings with a separate thermometer.
-
Move the aquarium away from cold drafts where possible.
-
Check the aquarium lid and maintain appropriate ventilation.
-
Measure the rear and side panels before cutting insulation.
-
Install exterior foam board or another suitable material securely.
-
Keep insulation away from electrical connections and equipment ventilation openings.
-
Monitor water temperature during the coldest part of the day.
-
Inspect for condensation, dampness, and loose panels.
-
Prepare a plan for power outages, including oxygenation and temperature monitoring.
-
Record temperature and energy-use data if you want to evaluate performance.
-
Reassess the setup after any major change in room temperature.
A little preparation can help prevent stressful temperature fluctuations and reduce the amount of work your aquarium heater must do.
20. Frequently Asked Questions About DIY Aquarium Insulation
Does foam board work better than bubble wrap?
Rigid foam board generally offers strong insulating performance for its thickness and is easier to use as a permanent panel.
Bubble wrap is lighter and easier to install temporarily. However, the exact result depends on thickness, coverage, product construction, and the conditions around the aquarium.
A controlled test is the best way to compare them for your particular setup.
Can I put bubble wrap directly inside my aquarium?
No. Ordinary packaging bubble wrap is not designed for immersion in aquarium water. It may introduce unsuitable chemicals, deteriorate, interfere with equipment, or be damaged by fish.
Keep it on the outside of the aquarium.
Is it safe to cover all four sides of an aquarium?
It may be possible to insulate all exterior sides in some setups, but complete coverage is not automatically necessary or beneficial.
Avoid obstructing observation, equipment access, ventilation, or electrical components. Keep the aquarium structurally supported and inspect for trapped moisture.
Should I insulate the bottom of my aquarium?
Bottom insulation may reduce heat transfer through the base in some setups, but the support arrangement is critical.
Use only an appropriate aquarium mat or a support solution approved for the tank's design. Never add uneven or compressible material beneath a filled aquarium without confirming that it will not compromise support.
Will insulation stop my aquarium from cooling during a power outage?
No. Insulation slows heat loss but cannot prevent it indefinitely.
The aquarium will eventually approach the surrounding temperature if no heat is supplied. The rate depends on the water volume, starting temperature, room conditions, and insulation.
Continue monitoring the water and follow an emergency plan.
Can I use a space heater to warm the room around my aquarium?
A suitable room-heating system may help maintain a stable ambient temperature, but it must be used safely.
Keep portable heaters away from water, electrical cords, curtains, and other combustible materials. Never leave an unsafe heating arrangement unattended.
Avoid directing intense heat at one aquarium panel, because uneven heating can create unnecessary temperature stress or thermal strain.
Does a thicker insulation layer always work better?
Greater thickness often increases thermal resistance when the same type of insulation is used, but the practical benefit depends on the complete installation.
Coverage gaps, air movement, exposed surfaces, and moisture may have a significant influence.
Compare the temperature records before deciding whether extra thickness is worthwhile.
How do I know if my DIY insulation is working?
Record water temperature and room temperature at consistent intervals before and after installation.
If the insulated aquarium cools more slowly under comparable conditions, that is evidence that the setup is improving heat retention.
If you want to evaluate energy savings, compare heater electricity consumption while maintaining the same target temperature.
Is aquarium insulation necessary in every home?
No. An aquarium in a stable, heated room may not need additional insulation.
The need depends on the climate, room temperature, aquarium design, species requirements, and how effectively the heater maintains the desired conditions.
Start by monitoring temperature and identifying the source of any fluctuations.
Conclusion: Simple DIY Materials Can Make a Meaningful Difference
Foam board, bubble wrap, towels, cardboard, and reflective insulation can all contribute to aquarium heat retention under the right conditions, but they do not offer identical performance.
Rigid foam board is a strong option for long-term insulation because it combines useful thermal resistance with a durable, easy-to-fit structure. Bubble wrap is convenient for temporary protection. Towels and blankets may help during short cold spells, while cardboard is better suited to inexpensive experiments in dry conditions. Reflective materials can be useful in particular arrangements, but their effectiveness depends on installation and the presence of suitable insulating layers.
The most important lesson is that insulation works best as part of a complete aquarium care strategy.
Maintain an appropriate water temperature, use a reliable heater, reduce drafts, fit a suitable lid, and monitor the aquarium throughout winter. Test materials under controlled conditions rather than assuming that a thicker layer or a more expensive product will always perform better.
With careful installation and regular monitoring, a simple DIY insulation system can help reduce unnecessary heat loss, support more stable water temperatures, and potentially lower heater energy consumption.
Most importantly, prioritize fish health and electrical safety over any insulation experiment. Your goal is not to make the aquarium airtight or cover it with as many materials as possible. It is to create a stable, safe environment in which your fish can remain healthy throughout the coldest months of the year.